Knowledgebase articles
- Welcome to the Knowledge Base
- Introduction
- Workbooks Support: Your Go-To Guide
- Getting Started
- Preferences
- Activities
- Cases
- Introduction to Cases
- Displaying & Adding Cases
- Managing Cases
- Using the Case Portal
- Email
- Importing Data
- Leads
- Marketing
- Introduction to Marketing
- Event Management
- Compliance Records
- Spotler Integration
- What is Spotler?
- Navigating your Spotler homepage
- Introduction to GatorMail
- GatorMail Configuration
- Sending Emails in GatorMail
- Advanced Features
- Setting up the Plugin
- Viewing Web Insights Data on your Form Layouts
- Domain Names and Online Activities
- Reporting incorrect Leads created through Web Insights
- Reporting on Web Insights data
- Using UTM Values
- Why aren’t Online Activities being created in the database?
- Why is GatorLeads recording online activities in a foreign language?
- GatorSurvey
- GatorPopup
- Integrations
- SFTP/FTP Processes
- Mapping
- Docusign Integration
- DocuSign Functionality
- Adobe Sign Integration
- Zapier
- Introduction to Zapier
- Available Triggers and Actions
- Linking your Workbooks Account to Zapier
- Posted Invoices to Xero Invoices
- Xero payments to Workbooks Tasks
- New Case to Google Drive folder
- New Case to Basecamp Project
- New Workbooks Case to JIRA Ticket
- Jira Issue to new Case
- 123FormBuilder Form Entry to Case
- Eventbrite Attendee to Sales Lead and Task
- Facebook Ad Leads to Sales Leads
- Wufoo Form Entry to Sales Lead
- Posted Credit Note to Task
- Survey Monkey responses to Tasks
- Multistep Zaps
- Email Integrations
- Microsoft Office
- Auditing
- Comments
- People & Organisations
- Introduction to People & Organisations
- Using Postcode Lookup
- Data Enrichment
- Reporting
- Transaction Documents
- Displaying & Adding Transaction Documents
- Copying Transaction Documents
- Transaction Documents Fields Help
- Transaction Documents Line Items Help
- Printing & Sending Transaction Documents
- Managing Transaction Document Currencies
- Managing Transaction Document Statuses
- Setting a Blank Default Currency on Transaction Documents
- Credit Notes
- Customer Orders
- Invoices
- Quotations
- Supplier Orders
- Sagelink
- Configuration
- Releases & Roadmap
Setting up a Web2Lead Form
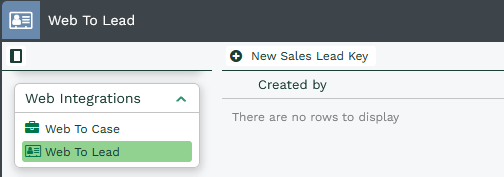
To set up a Web2Lead Form you will need to access the Web Key setup form from Start > Configuration > Email & Integration > Web To Lead and select New Sales Lead Key.

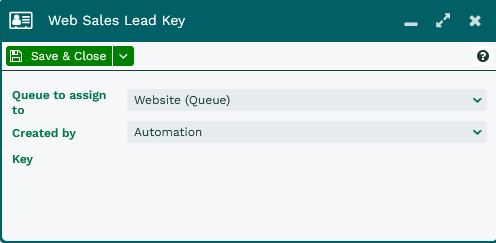
This creates a new dialogue box that allows you to set who the new Sales Lead will be assigned to, as well as the created by.
We would recommend that you set the Created by to be the Automation User as this will always have the relevant access and cannot be disabled.

Once you have configured who the Lead will be Created by and Assigned to – press Save, this will then generate an API Key and give you access to the Web to Lead Form.
It is important that the web key is not removed from your form. This is a unique key that will be used to authenticate into your Workbooks database and create records. When looking at the HTML code, the web key will look something like the below:
<input type =’hidden’ name=’web_key’ value=’75e7c935f5ecdfa62275c8c646c3bc8e8dabc51c’ />
By selecting the Form button you will be able to download the Web2Lead html file, opening this provides you with a basic html form with all of the Lead Fields as well as Custom Fields that you have created.

Additionally, you can use the Web2Lead Form to create a Compliance Record that attaches to the Lead, from the Web Form you can set the Legal Grounds and Purpose, as well as whether the User selects whether they want to receive marketing Communications.

Information on how to hide or make fields required can be found on our Editing a Web Key page. From this page your Web Developer will also be able to create success or failure pages from the Submission button on the Form.
